IDE Configuration
Setup multiple IDE Hard Drives and CD/DVD drives in your PC, including SATA drives
Primary, Secondary, Master, Slave?
Generally, a Motherboard will have two IDE sockets, 'Primary IDE' (or IDE0) and 'Secondary IDE' (or IDE1)
You can connect up to two devices to each IDE connector using a suitable cable. Since the computer can only 'talk' to one device at a time, each device is given a 'priority', Master (High Priority) or Slave (Low Priority)
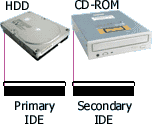
On IDE devices, priority is configured using a small 'Jumper' cap (pictured top left). A small metal clip inside the cap will connect the two pins it covers and configure the hardware.

Basic IDE drive configuration
A basic PC will have one HDD and one CD-ROM and may be configured as shown to the right. To achieve maximum performance from each device, they are both configured as Master.
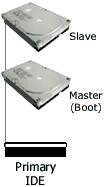
Any additional devices to be connected to each cable should be configured as Slave.
Note
The HDD configured as Primary-Master
(the Master HDD on the Primary IDE Cable) is usually known as the
Boot drive. It is this drive that the PC will 'talk' to
first to load the Operating System software.


Adding extra IDE drives
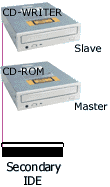
This diagram demonstrates how it is possible to add further devices. In this case, an extra HDD and a CD-Writer has been added. Since there was already a Master device on each cable, each additional device is configured as Slave.
Of course it is perfectly acceptable to connect a CD-ROM as Primary-Slave or a HDD as Secondary-Master or Secondary-Slave, but Primary-Master should ideally be a HDD for best performance.
What about configuring Serial-ATA Devices?
Happily, Serial-ATA Devices do not require configuration of this kind, as it is only possible to connect one Serial-ATA device to a Serial-ATA connector on the motherboard, so each Serial-ATA device is essentially 'master' on each Serial-ATA channel.